| # | Model | Image | Product Name | Price |
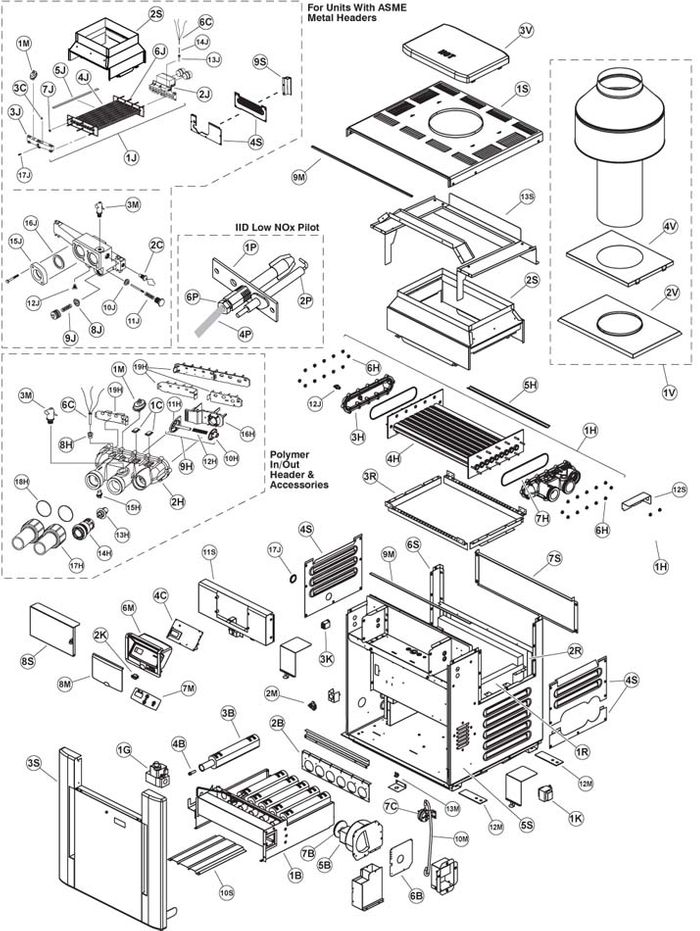
| 1R | 10079F |  | Raypak Refractory Common (Left and Right) # 010079F | |
| Burner-Tray |
| 1b | 010343F |  | Raypak Burner Tray w/Burners (0-5000) 207A # 010343F | |
| 1b | 010344F | | Raypak Burner Tray w/Burners (0-5000) 267A # 010344F | |
| 1b | 010345F | | Raypak Burner Tray w/Burners (0-5000) 337A # 010345F | |
| 1b | 010346F | | Raypak Burner Tray w/Burners (0-5000) 407A # 010346F | |
| 1b | 010084F | | Raypak Burner Tray w/o Burner (0-5000) 207A # 010084F | |
| 1b | 010085F | | Raypak Burner Tray w/o Burner (0-5000) 267A # 010085F | |
| 1b | 010086F | | Raypak Burner Tray w/o Burner (0-5000) 337A # 010086F | |
| 1b | 010087F | | Raypak Burner Tray w/o Burner (0-5000) 407A # 010087F | |
| 2b | 010254F | | Raypak Burner Hold Down Kit 207A # 010254F | |
| 2b | 010255F | | Raypak Burner Hold Down Kit 267A # 010255F | |
| 2b | 010256F | | Raypak Burner Hold Down Kit 337A # 010256F | |
| 2b | 010257F | | Raypak Burner Hold Down Kit 407A # 010257F | |
| 3b | 310732 | | Raypak Burner 207A(3),267A(4),337A(5),407A(6) # 310732 | |
| 4b | 351510 | | Raypak Burner Orifice Nat. #30 (0-5000),185(3),265(5),335(6),405(7) # 351510 | |
| 4b | 351523 | | Raypak Burner Orifice Nat. #31 (above 5000 ft.), 185(3),265(5),335( # 351523 | |
| 5b | 010042F |  | Raypak Blower # 010042F | |
| 6b | 010338F | | Raypak Combustion Air Orifice Plate 207A # 010338F | |
| 6b | 010339F | | Raypak Combustion Air Orifice Plate 267A # 010339F | |
| 6b | 010340F | | Raypak Combustion Air Orifice Plate 337A # 010340F | |
| 6b | 010341F | | Raypak Combustion Air Orifice Plate 407A # 010341F | |
| 7b | 010871F | | Raypak Cooling Fan # 010871F | |
| Controls |
| 1c | 47-197-1052 |  | Raypak Thermostat Auto Reset 135� Surface Mount # 006725F | |
| 2c | 600892B |  | Raypak THERMOSTAT AUTO RESET13-B/PAK # 600892B | |
| 3c | 600893B |  | Raypak THERMOSTAT AUTO RESET14-B/PAK # 600893B | |
| 4c | 010253F |  | Raypak PC BOARD CONTROL IID 185A-405A (Tan w/3-Wire Sensor) # 010253F | |
| 6c | 009577F |  | Raypak Temp Sensor Kit IID 185B-405B 206-407-3-Wire # 009577F | |
| 7c | 008062F |  | Raypak N.O. Air Pressure Switch, 181-267 # 008062F | |
| 7c | 008135F | | Raypak N.O. Air Pressure Switch, 331-407 # 008135F | |
| 7c | 010354F |  | Raypak Blower Pressure Switch 337A # 010354F | |
| 7c | 010355F |  | Raypak Blower Pressure Switch 407A # 010355F | |
| Gas-Valve |
| 1g | 010329F |  | Raypak Combination Valve -Gas On/Off -Nat # 010329F | |
| Heater-Exchanger-Polymer-Heads |
| 1h | 010043F | | Raypak Heat Exchange Assy Copper,206A/207A/Polymer # 010043F | |
| 1h | 010044F | | Raypak Heat Exchange Assy Copper,266A,267A,Polymer # 010044F | |
| 1h | 010045F | | Raypak Heat Exchange Assy Copper,336A/337A/Polymer # 010045F | |
| 1h | 010046F | | Raypak Heat Exchange Assy Copper,406A/407A/Polymer # 010046F | |
| 1h | 010356F | | Raypak Heat Exchange Assy Cupro Nickel,206A/207A/Polymer # 010356F | |
| 1h | 010357F | | Raypak Heat Exchange Assy Cupro Nickel,266A/267A/Polymer # 010357F | |
| 1h | 010358F | | Raypak Heat Exchange Assy Cupro Nickel,336A/337A/Polymer # 010358F | |
| 1h | 010359F | | Raypak Heat Exchange Assy Cupro Nickel,406A/407A/Polymer # 010359F | |
| 2h | 006827F |  | Raypak HDR IN/OUT 185-405 PPOOL-KIT # 006827F | |
| 2h | 006706F |  | Raypak HDR IN/OUT 185-405CAPRON-KIT # 006706F | |
| 3h | 006707F |  | Raypak HDR RETURN 185-405CAPRON-KIT # 006707F | |
| 4h | 010059F | | Raypak Tube Bundle Copper,206A**/207A/Polymer # 010059F | |
| 4h | 010060F | | Raypak Tube Bundle Copper,266A**/267A/Polymer # 010060F | |
| 4h | 010061F | | Raypak Tube Bundle Copper,336A**/337A/Polymer # 010061F | |
| 4h | 010062F |  | Raypak Tube Bundle Copper,406A**/407A/Polymer # 010062F | |
| 4h | 010364F | | Raypak Tube Bundle Cupro Nickel,206A**/207A/Polymer # 010364F | |
| 4h | 010365F | | Raypak Tube Bundle Cupro Nickel,266A**/267A/Polymer # 010365F | |
| 4h | 010366F | | Raypak Tube Bundle Cupro Nickel,336A**/337A/Polymer # 010366F | |
| 4h | 010367F | | Raypak Tube Bundle Cupro Nickel,406A**/407A/Polymer # 010367F | |
| 5h | 010038F |  | Raypak HT EX BAFFLE R206A-KIT # 010038F | |
| 5h | 010040F |  | Raypak HT EX BAFFLE R336A-KIT # 010040F | |
| 5h | 010041F |  | Raypak HT EX BAFFLE R406A-KIT # 010041F | |
| 5h | 005261F |  | Raypak HT EX BAFFLE R265-KIT # 005261F | |
| 6h | 008259F |  | Raypak Flange Nut Kit # 008259F | |
| 7h | 006713F |  | Raypak O RING GASKET (2) 185-405-KIT # 006713F | |
| 8h | 47-197-1075 |  | Raypak Sensor Adapter DSI # 006714F | |
| 9h | 006715F |  | Raypak BYPASS 185-405-KIT # 006715F | |
| 10h | 47-197-1078 |  | Raypak Bypass Valve # 006716F | |
| 11h | 47-197-1079 | | Raypak Bypass Dam / Shaft # 006717F | |
| 12h | 006718F |  | Raypak BYPASS SPRING 185-405-KIT # 006718F | |
| 13h | 006719F |  | Raypak Unitherm Governor, 185-405, w/ Gasket # 006719F | |
| 14h | 006720F |  | Raypak UG PLUG 185-405-KIT # 006720F | |
| 16h | 011603F | | Raypak Inlet/Outlet Header Dam # 011603F | |
| 17h | 006723F | | Raypak 2"PVC Connector & Nut, w/ O-ring (2) # 006723F | |
| 18h | 006724F |  | Raypak Inlet/Outlet Header O-Ring (2) # 006724F | |
| 19h | 006826F |  | Raypak HEADER BAFFLE,185-405-KIT # 006826F | |
| Heat-Exchanger-Metal |
| 1j | 006727F | | Raypak Heat Exchange Assy. ASME CI (Complete),265/266/267 # 006727F | |
| 1j | 010051F | | Raypak Heat Exchange Assy.Copper ASME CI,206A/207A/Metal # 010051F | |
| 1j | 010053F | | Raypak Heat Exchange Assy.Copper ASME CI,336A/337A/Metal # 010053F | |
| 1j | 010054F | | Raypak Heat Exchange Assy.Copper ASME CI,406A/407A/Metal # 010054F | |
| 1j | 010360F | | Raypak Heat Exchange Assy.Cupro Nickel ASME CI,206A/207A/Metal # 010360F | |
| 1j | 010361F | | Raypak Heat Exchange Assy.Cupro Nickel ASME CI,266A/267A/Metal # 010361F | |
| 1j | 010362F | | Raypak Heat Exchange Assy.Cupro Nickel ASME CI,336A/337A/Metal # 010362F | |
| 1j | 010363F | | Raypak Heat Exchange Assy.Cupro Nickel ASME CI,406A/407A/Metal # 010363F | |
| 2j | 006730F |  | Raypak HDR IN/OUT 185-405CI ASME-KIT # 006730F | |
| 2j | 012319F | | Raypak Inlet/Outlet Header ASME CI # 012319F | |
| 3j | 006731F |  | Raypak HDR RETURN 185-405CI ASME-KIT # 006731F | |
| 4j | 010368F | | Raypak Tube Bundle Cupro Nickel ASME,206A**/207A/Metal # 010368F | |
| 4j | 010369F | | Raypak Tube Bundle 266A/267A Cupro Nickel/Metal ASME # 010369F | |
| 4j | 010370F | | Raypak Tube Bundle Cupro Nickel ASME,336A**/337A/Metal # 010370F | |
| 4j | 010371F | | Raypak Tube Bundle Cupro Nickel ASME,406A**/407A/Metal # 010371F | |
| 4j | 010055F | | Raypak Tube Bundle Copper ASME,206A* */207A/Metal # 010055F | |
| 4j | 006733F |  | Raypak TUBE BUNDLE ASME-KIT,265/266/267/Metal # 006733F | |
| 4j | 010058F | | Raypak Tube Bundle Copper ASME,406A **/407A/Metal # 010058F | |
| 5j | 010038F | | Raypak HT EX BAFFLE R206A-KIT # 010038F | |
| 5j | 010040F | | Raypak HT EX BAFFLE R336A-KIT # 010040F | |
| 5j | 010041F | | Raypak HT EX BAFFLE R406A-KIT # 010041F | |
| 5j | 005261F | | Raypak HT EX BAFFLE R265-KIT # 005261F | |
| 6j | 007870F | | Raypak Stud Bolt Kit # 007870F | |
| 7j | 800014B |  | Raypak GASKET HT EX 3/4 ID FLA-B/PAK # 800014B | |
| 8j | 062234B |  | Raypak UNATHERM GOV 155B-405-B/PAK # 062234B | |
| 9j | 850254 |  | Raypak SPRING-UG RETAINER # 850254 | |
| 10j | 062235B |  | Raypak BYPASS VALVE 105A-405-B/PAK # 062235B | |
| 11j | 850253 |  | Raypak SPRING-BYPASS # 850253 | |
| 12j | 500719 |  | Raypak VALVE-DRAIN 1/8 X STRAIGHT # 500719 | |
| 13j | 003765F |  | Raypak SENSOR WELL 105A-405-KIT # 003765F | |
| 14j | 300203 |  | Raypak Sensor Clip # 300203 | |
| 15j | 003766F |  | Raypak FLANGE IN/OUT 1-1/2 & 2-KIT # 003766F | |
| 16j | 062236B |  | Raypak GASKET HDR FLANGE 1-1/2-B/PAK # 062236B | |
| 16j | 800080B |  | Raypak GASKET HDR FLANGE 2" (Pkg of 2) # 800080B | |
| 17j | 005264F |  | Raypak DRAIN PLUG REAR HDR-KIT # 005264F | |
| Control-Box |
| 1k | 006736F |  | Raypak TRANSFORMER 120/240V-KIT # 006736F | |
| 2k | 009493F |  | Raypak Rocker Switch # 009493F | |
| 3k | 008784F |  | Raypak Relay 24VAC DPDT NO-KIT # 008784F | |
| Miscellaneous-Components |
| 1m | 47-197-1095 | | Raypak Pressure Switch 1.75 PSI # 006737F | |
| 1m | 009133F | | Raypak Pressure Switch 11 PSI Special # 009133F | |
| 1m | 47-197-1462 |  | Raypak Pressure Switch 1.75 PSI # 006737F | |
| 2m | 006035F | | Raypak Roll-Out Switch (Low Nox) # 006035F | |
| 3m | 008091F |  | Raypak Pressure Relieve Valve 125 PSI (Optional) # 008091F | |
| 3m | 007224F |  | Raypak Pressure Relief Valve 125 PSI (Optional) 266A,336A,406A # 007224F | |
| 6m | 009491F | | Raypak Control Panel IID (Includes Switch Decal) # 009491F | |
| 7m | 009492F |  | Raypak Switch/Decal-Membrane R185B-R405B # 009492F | |
| 8m | 009487F |  | Raypak Control Bezel Cover # 009487F | |
| 9m | 010350F | | Raypak Gasket Insulation (Swaybrace & Jacket Top) # 010350F | |
| 10m | 010348F |  | Raypak Blower / Air Pressure Switch Sample Tube # 010348F | |
| 12m | 011636 |  | Raypak Tie Down Bracket (Optional) # 11636 | |
| 13m | 006035F | | Raypak Roll-Out Switch (Low Nox) # 006035F | |
| 13m | 011745F | | Raypak Roll-Out Switch 250�F (Optional) # 011745F | |
| 13m | 011733F | | Raypak Roll-Out Switch 250�F (Upgrade) # 011733F | |
| n/a | 750125 | | Raypak Touch-up Paint (Green) # 750125 | |
| n/a | 750126 | | Raypak Touch-up Paint (Dark Gray) # 750126 | |
| n/a | 12011 | | Raypak Texas Code Add/On (ASME Only) # 12011 | |
| n/a | 052871F | | Raypak Deliming Kit (not shown) # 052871F | |
| n/a | 010347F | | Raypak Wire/Harness # 010347F | |
| Pilot |
| 1p | 010232F | | Raypak Pilot Nat. IID Low Nox # 010232F | |
| 2p | 011928F | | Raypak Pilot Electrode # 011928F | |
| 3p | 010233F | | Raypak Pilot Mounting Bracket 207A # 010233F | |
| 3p | 010234F | | Raypak Pilot Mounting Bracket 267A # 010234F | |
| 3p | 010235F | | Raypak Pilot Mounting Bracket 337A # 010235F | |
| 3p | 010236F | | Raypak Pilot Mounting Bracket 407A # 010236F | |
| 5p | 011926F | | Raypak Pilot Tube # 011926F | |
| 6p | 011927F | | Raypak Adapter Nut (Metric) # 011927F | |
| n/a | 010349F |  | Raypak Hi Tension Wire IID # 010349F | |
| Refractory |
| 2r | 010080F |  | Raypak Refractory Uncommon (Front and Rear) 207A # 010080F | |
| 2r | 010081F |  | Raypak Refractory Uncommon (Front and Rear) 267A # 010081F | |
| 2r | 010082F |  | Raypak Refractory Uncommon (Front and Rear) 337A # 010082F | |
| 2r | 010083F | | Raypak Refractory Uncommon (Front and Rear) 407A # 010083F | |
| 3r | 010262F | | Raypak Refractory Retainer Kit 207A # 010262F | |
| 3r | 010263F | | Raypak Refractory Retainer Kit 267A # 010263F | |
| 3r | 010264F | | Raypak Refractory Retainer Kit 337A # 010264F | |
| 3r | 010265F | | Raypak Refractory Retainer Kit 407A # 010265F | |
| Sheetmetal |
| 1s | 010047F | | Raypak Jacket Top (Louvered) 206A # 010047F | |
| 1s | 010048F | | Raypak Jacket Top (Louvered) 266A # 010048F | |
| 1s | 010049F | | Raypak Jacket Top (Louvered) 336A # 010049F | |
| 1s | 010050F | | Raypak Jacket Top (Louvered) 406A # 010050F | |
| 2s | 010063F | | Raypak Flue Collector (Units with Polymer Header) 207A # 010063F | |
| 2s | 010064F | | Raypak Flue Collector (Units with Polymer Header) 267A # 010064F | |
| 2s | 010065F | | Raypak Flue Collector (Units with Polymer Header) 337A # 010065F | |
| 2s | 010066F | | Raypak Flue Collector (Units with Polymer Header) 407A # 010066F | |
| 2s | 010067F | | Raypak Flue Collector (Units with Metal Header) 207A # 010067F | |
| 2s | 010068F | | Raypak Flue Collector (Units with Metal Header) 267A # 010068F | |
| 2s | 010069F | | Raypak Flue Collector (Units with Metal Header) 337A # 010069F | |
| 2s | 010070F | | Raypak Flue Collector (Units with Metal Header) 407A # 010070F | |
| 3s | 010271F | | Raypak Door Assembly Rheem 207A # 010271F | |
| 3s | 010272F | | Raypak Door Assembly Rheem 267A # 010272F | |
| 3s | 010273F | | Raypak Door Assembly Rheem 337A # 010273F | |
| 3s | 010274F | | Raypak Door Assembly Rheem 407A # 010274F | |
| 3s | 010267F | | Raypak Door Assembly Raypak 207A # 010267F | |
| 3s | 010268F | | Raypak Door Assembly Raypak 267A # 010268F | |
| 3s | 010269F | | Raypak Door Assembly Raypak 337A # 010269F | |
| 3s | 010270F | | Raypak Door Assembly Raypak 407A # 010270F | |
| 4s | 010311F | | Raypak Access Panel Set (3 Pcs Units with Polymer Header) # 010311F | |
| 4s | 010312F | | Raypak Access Panel Set (3 Pcs. Units with Metal Header) # 010312F | |
| 5s | 010313F | | Raypak Jacket Side Panel Right # 010313F | |
| 6s | 010314F | | Raypak Jacket Side Panel Left # 010314F | |
| 7s | 010315F | | Raypak Jacket Rear Panel 207A # 010315F | |
| 7s | 010316F | | Raypak Jacket Rear Panel 267A # 010316F | |
| 7s | 010317F | | Raypak Jacket Rear Panel 337A # 010317F | |
| 7s | 010318F | | Raypak Jacket Rear Panel 407A # 010318F | |
| 8s | 9505 |  | Raypak Poolstat Cover/Lock # 9505 | |
| 9s | 010319F | | Raypak High Limit Cover # 010319F | |
| 10s | 010320F | | Raypak Base Heat Shield # 010320F | |
| 11s | 010321F | | Raypak Up Front Control Panel 206A # 010321F | |
| 11s | 010322F | | Raypak Up Front Control Panel 266A # 010322F | |
| 11s | 010323F | | Raypak Up Front Control Panel 336A # 010323F | |
| 11s | 010324F | | Raypak Up Front Control Panel 406A # 010324F | |
| 12s | 010342F | | Raypak High Limit Shield # 010342F | |
| 13s | 010325F | | Raypak Weather Shield 206A # 010325F | |
| 13s | 010326F | | Raypak Weather Shield 266A # 010326F | |
| 13s | 010327F | | Raypak Weather Shield 336A # 010327F | |
| 13s | 010328F | | Raypak Weather Shield 406A # 010328F | |
| Venting |
| 1v | 9838 | | Raypak Indoor Stack Kit (Includes inner adapter panel) 206A # 9838 | |
| 1v | 9839 | | Raypak Indoor Stack Kit (Includes inner adapter panel) 266A # 9839 | |
| 1v | 9840 | | Raypak Indoor Stack Kit (Includes inner adapter panel) 336A # 9840 | |
| 1v | 9841 | | Raypak Indoor Stack Kit (Includes inner adapter panel) 406A # 9841 | |
| 1v | 9834 | | Raypak Outdoor Stack Kit (Includes inner adapter panel) 206A # 9834 | |
| 1v | 9835 | | Raypak Outdoor Stack Kit (Includes inner adapter panel) 266A # 9835 | |
| 1v | 9836 | | Raypak Outdoor Stack Kit (Includes inner adapter panel) 336A # 9836 | |
| 1v | 9837 | | Raypak Outdoor Stack Kit (Includes inner adapter panel) 406A # 9837 | |
| 2v | 010330F | | Raypak Stack Adapter 207A # 010330F | |
| 2v | 010331F | | Raypak Stack Adapter 267A # 010331F | |
| 2v | 010332F | | Raypak Stack Adapter 337A # 010332F | |
| 2v | 010333F | | Raypak Stack Adapter 407A # 010333F | |
| 3v | 10334 | | Raypak "Pagoda" Top, Green # 10334 | |
| 3v | 10335 | | Raypak "Pagoda" Top 267A # 10335 | |
| 3v | 10336 | | Raypak "Pagoda" Top 336A # 10336 | |
| 3v | 10337 | | Raypak "Pagoda" Top 406A # 10337 | |
| 4v | 011461F | | Raypak Outer Stack Adapter 206A # 011461F | |
| 4v | 011462F | | Raypak Outer Stack Adapter 266A # 011462F | |
| 4v | 011463F | | Raypak Outer Stack Adapter 336A # 011463F | |
| 4v | 011464F | | Raypak Outer Stack Adapter 406A # 011464F | |